Magnepan MG-IIIa Parts Connection Upgrade
First of all, I don't mean to screw over the Parts Connection for $19.40, but for people who already have enough solder for the job, there's not a lot of point to getting a whole big roll of it! Besides, I've re-written the instructions so they're more detailed. I think that's good enough ;)
Okay, first, the capacitors you will need, and their Parts Connection SKU#'s. Of course, you'll need two of each, unless you have only one speaker!
| SKU# | mf | DC Volts | Tolerance | Price | Description |
| 51434 | 9 | 200 | 10% | $15.50 | MultiCap PPMFX - Metallized polypropylene capacitor |
| 51436 | 12 | 200 | 10% | $18.25 | MultiCap PPMFX - Metallized polypropylene capacitor |
| 51150 | 4.7 | 400 | 5% | $2.60 | Solen Fast Cap - Metallized polypropylene capacitor |
| 51556 | 12 | 400 | 5% | $4.95 | Solen Fast Cap - Metallized polypropylene capacitor |
| 51562 | 51 | 400 | 5% | $14.50 | Solen Fast Cap - Metallized polypropylene capacitor |
Once all this groovy stuff has been delivered (presumably safely), it's time to rip apart your speakers apart and do the upgrade!
These instructions apply to my IIIa's perfectly. They were manufactured in August of 1987. Some earlier IIIa's may be different, I can't help you there, since I've never seen them! The modification they made that should most effect this upgrade is a 12mf cap, but I'm not sure which one it is. I'm presuming it's the midrange one, but I'm not sure. If anything looks funny, either leave that part out, or put it in wherever you think it should go. I can't help you if your speakers are different from mine.
If you know how to do all this upgrade stuff, skip my more detailed instructions and go straight to the parts replacement list.
I had my socks off already, so getting at the internal crossover was a no-brainer. However, if you don't have your socks off, you have two choices. You can either cut a hole in the back of the sock around the internal crossover, or you can roll the sock up enough to get at the crossover circuit. You'll have to unscrew the connection panel.
Taking the socks off is a major pain, there's about 3 million staples in the bottom, and if you don't have a staple gun, getting them all back in is going to be quite interesting. If you decide to go this route, lay the speaker down on a long table and take off the feet. Gently pull the tape off the bottom so as not to damage the sock too much, and then take out all the staples. Then roll the sock up, and do the mods.
The other option would be to cut the sock where the internal crossover not completely out, creating sort of an "access panel" that you could sew or tape back up (or just leave flapping!) when you're done.
Note that the caps will be too big to fit in there, and if you choose the roll-up method, the new caps will bulge the sock out a bit in the back.
Once you've gained access to the internal crossover circuit, it's time to remove the old caps. On my speakers, they used a 2mf and 10mf in parallel to make a 12mf cap, both yellow Elpac caps. Cut both pairs out with wire cutters, or whatever else you have at your disposal.
Magnepan has thoughtfully glued them in, so I used a flathead screwdriver to pry them loose just a bit then pulled on them to get them out.
A note about polarity: I have no clue. I just put them in so the text was pointing the same way as it was on the old caps, that is, bottom to top.
The black 12mf Solen cap goes nearest the connection panel, for the midrange driver. Just solder it in where you took out the old ones.
The 12mf MultiCap goes to the right of the grey metal panel thingie, in series with the tweeter.
Now it's time to open up the external crossover box. Four Phillips head screws and a lot of finagling later, you're in.
First thing, you should cut out the four Seacor 15mf caps. Remember which way the text was pointing, because that's the same way you should put in the new ones. I think...
On the bottom of the box near the input connection there are two black caps, a 100mf and 50mf in parallel. Add the 4.7mf Solen to this group, just solder its leads to the wires that connect the two caps together on each side.
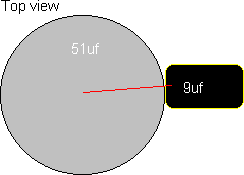
Now, there is a way to do this so the crossover box can be closed afterwards. You have to make a "piggyback" out of the remaining two caps (9mf Multicap, 51mf Solen). Mine ended up looking like this:
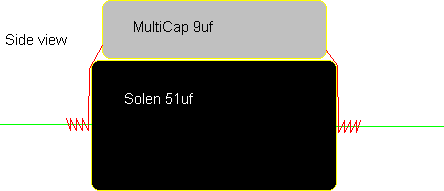
Twist the MultiCap's lead around the Solen's, and solder at the twist.
Then just solder these in place where the four Seacors were. Have the MultiCap sort of lay on top of the inductor between the two output connections.
Fire it up and test them out!
I found it sounds pretty harsh for the first 10 minutes or so, but as time goes on it just smoothes out. As of this writing, my new caps have about 48 hours on them, and they sound great.
Once you're happy they work, you can start the "50-100 hour break-in period", or put your speakers back together, then do the break in.
I guess that's all, folks.
Please direct any questions, complaints, insults, and other various correspondence to me, Jeff, at feckn_eejit@hotmail.com. I apologize for the crude email address ;)
Finally, for those of you who know how to do all this upgrade jazz, a quick little list of which caps to replace with what.
Internal crossover:
Replace 10+2mf Elpac caps in
series with the tweeter with one 12mf
Multicap.
Replace 10+2mf Elpac caps in parallel with
the midrange driver with one 12mf Solen Fast Cap.
External crossover:
Replace 15+15+15+15mf Seacor
caps with the 51mf Solen and 9uf MultiCap in
parallel.
Add the 4.7mf solen cap in paralell with
the 100+50mf cap near the input connector.
Allow 50-100 hours of playing time to burn in.