Magneplanar Stand Construction Project (PanStands)
6-15-2000
Background:
It has long been known that speakers require a firm footing
in order to reproduce sound properly. Newton discovered some time ago that every
action has an equal and opposite reaction. Imagine for a moment the diaphragm of
a speaker vibrating back and forth; the vibrating membrane is the process in
which electrical signals from your amplifier are converted into acoustical
energy. If the membrane isn't held in a fixed position while reproducing sound,
a significant amount of the signal will be lost. Many people who own box
speakers take steps to minimize this loss by purchasing after-market stands.
Most of the better stands for box speakers are very heavy, have points on the
bottom and bolt on to the speaker.
Purpose:
The Magneplanars come with bolt-on feet that do a good job of
keeping the speaker from falling over – that's about it. Push on the top of your
Maggie's – do they budge? Grab the top corner and gently rock it back and forth
– do they flex? If you own 1.6QR's and I do, your answer will be yes.
Constructing a rigid stand that supports the full frame of the speaker will
eliminate flexing and improve overall sound quality.
I can buy
stands, why construct my own?
At least one company manufactures an
after market stand for the Maggie. For about $225 SoundAnchor will sell you a set of
tubular steel units that look
nice and will bolt right up to your Maggie just as your current legs do. Problem
is, the SoundAnchor stands support the speaker only up to the top of the
internal cross member (about 1 ½ feet). This situation will not cure the flexing
problems in the panel and will not provide an optimum solution that a better
designed stand will.
What to expect:
- Improved bass response (especially with "bass wing" installed)
- Improved impact/slam
- Improved inner-detail
- Improved clarity
- Improved imaging
Relative performance improvements
(10 = biggest, 1=smallest)
Tools required:
- Miter box
- Hand saw
- Table saw (optional)
- Hand drill (cordless preferred)
- Drill bits
- Phillips screw driver (medium)
- Hammer
- Framing square
- Sheet metal
bender
- Adjustable c-clamp
Material required:
- 8 pieces of ¾" x 1 ½" x 8' lumber of your choice
- 1 sheet of 1/8" compressed fiberboard (optional for bass wing)
- 1 ½" #6 sheet metal screws (box)
- ¾" #6 sheet metal screws (box)
- 6 perforated
metal stud anchors
- 8 Archery points (small)
- Wood glue
Approximate cost:
$50.
PanStand construction:
Although constructing the PanStands isn't
difficult, it can be time consuming. Plan on spending the better part of an
afternoon to complete the project. Note that all of my measurements are for the
Magneplanar 1.6QR. You can make the appropriate adjustments to tailor them to
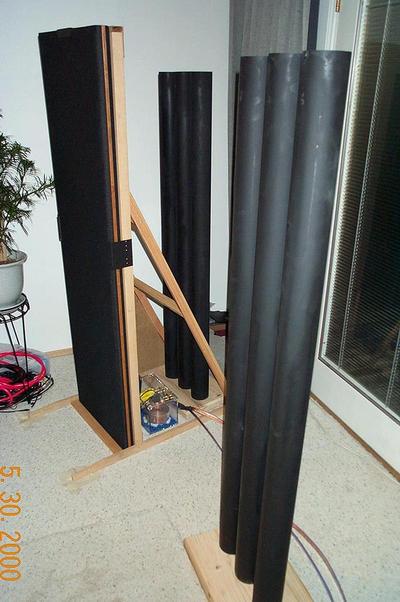
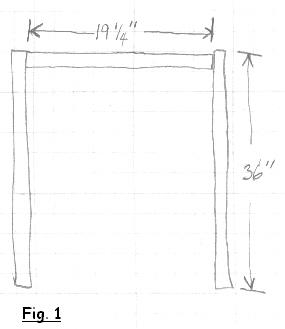
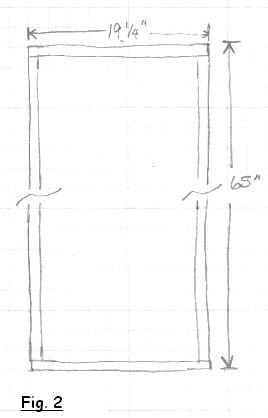
your particular model. The PanStands are built by joining three separate
assemblies together. Figure 1 shows the bottom base assembly. Figure 2 shows the
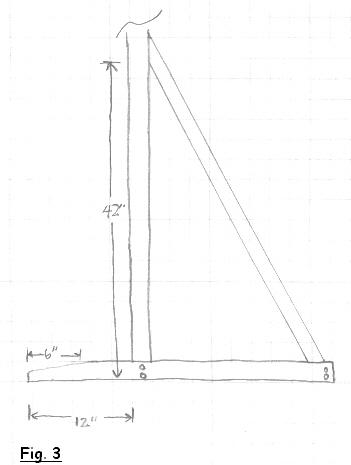
frame assembly that supports the Maggie panel. Figure 3 shows how to install the
strut assembly from the base to the panel assembly.
Building it:
Assembly 1 and 2 all use butt joints that are held in place
with 1 ½" sheet metal screws. All joints should be glued and then screwed
together. It's critical to pre drill each screw hole to avoid splitting the
wood. A framing square should be used on all 90-degree joints to assure they are
square. I used two screws at each joint to assure a rigid connection (see photo #1).
Assembly 2, the panel support frame, once constructed should be reinforced with
1/8" fiberboard triangles and screwed in place with ¾" sheet metal screws (see
photo #2). Once
assembly 1 and 2 are constructed, refer to figure 3 for measurements to join
them together. The bottom of the rear support angle braces are joined to the
base assembly with a single screw from the inside. The top of the rear support
angle braces need a miter cut at the angle you determine by leaning the support
brace against the panel support frame. It's important to assure that assembly 1
and 2 are joined together at an exact 90-degree angle before marking your angle
cut. I added two horizontal pieces between the angle braces to improve lateral
rigidity. For aesthetics, I used a jigsaw to bevel the fronts of the base
assembly 1 (see figure 3).
Once the stand is fully constructed it should
look something like photo #3. At this
point you're almost done! You need to add a cross member to the bottom of
assembly 2 which will be used to secure the bottom of the Maggie to the PanStand
(see photo #4).
Drill two holes in the cross member that align with the holes on the Magnepan
(which are used to bolt on the stock legs).
Place your Maggie into the
stand – it should be a perfect fit if you measured correctly. Secure the Maggie
to the PanStand using the stock bolts that once held the legs on. Temporarily
clamp the top of the Maggie on to the PanStand. You now need to bend some sheet
metal to construct the six C-clamp fasteners that will keep the Maggie secure
against the PanStand support frame. It's very important that the fasteners be
constructed so that they tightly fit around the front of the Maggie and the rear
of the PanStand support frame – you don't want any play which will cause a loss
of rigidity or become a source of vibration. Secure the c-clamps to the PanStand
using one screw through the side and another through the rear (see photo #5).
The final step is to place 4 archery points on to the bottom of each of
the base assemblies. You can do this with the Maggie bolted in place. Lean the
stand forward and on the bottom of the base assembly measure 1 ½" in from each
edge and mark it. Drill ½ way through the bottom and thread the archery point
into the wood. I recommend wrapping some masking tape around your drill bit to
set the depth – this will avoid run-away problems.
Optional final, final
step: Referring to figure #3 cut out a triangular piece of fiberboard to cover
up the opening on the bass panel side of the stand. This addition will prevent
the rear low-frequency waves from being cancelled (see photo #6). Expect
better and more extended bass with the wing in place.
That's it. You're
done!
Links:
See Jeff's version
of the PanStands. Note the use of heavier stock and added bracing.
Ed
Hsu's Magnepan 1.6QR cross-over
modification page.
Note: Some of the photos that are linked to this document are rather large
(80k) and may require some time to load depending on your connection speed. I
purposely kept the resolution high so that you can use them as a
reference.
Cheers!