AndyR’s
Tweaking Maggie IIIs/IIIAs
for their ultimate sonic performance!
Here are my suggestions as to how to tweak your
MG-IIIs or MG-IIIAs to their “ultimate” sonic performance level. It won’t make them sound as good as MG3.6s
but I believe they will deliver as good a sound – or maybe even better – than
stock MG3.3s or MG3.5s.
NB: IIIs and IIIAs have the same drivers but
different crossover regimes (apart from a ribbon change during the life of the
IIIAs) … thus you can turn a III into a final-configuration IIIA. I believe the mid-panel tie-down arrangement
was then changed with the MG3.3 and MG3.5 – which prompted further crossover
changes – so their crossovers are not necessarily appropriate for III/IIIAs.
I’ve assumed here that you are quite happy to rip
into your III/IIIAs – i.e. to get the maximum benefit, the changes are
non-reversible. You can’t sit on the
fence here! If you want to “fiddle”
around slightly with your IIIs/IIIAs then you’ll be able to make them sound a
bit better but, to really deliver what they are capable of, you have to strip
them down (so you’ll ruin your current “socks” for a start!).
Some background first:
·
Maggie IIIAs
having ribbon serial nos. after SN 63744 have different ribbons to previous
Maggie IIIAs. The earlier ribbons had a
3W
resistance but the later ribbons – i.e. current ribbons, if you’ve had a ribbon
rebuild recently – have 2W resistance and so a 1W resistor is needed in series with the ribbon, to bring the total back
to the 3W value assumed by the crossover component values.
NB: This is not the additional
“tweeter attenuation” resistor!
·
Maggie IIIAs
with serial nos. after SN 64476 have a 12mF cap in parallel with the mid-range panel,
to change the low-pass crossover to a 12dB/octave slope.
·
I believe
Maggie III/IIIA driver resistances are:
o base – 4W
o mid – 3.9W
o ribbon – 2W (after ribbon SN 63744)
plus 1W resistor in series.
· standard IIIA crossover
points (-3dB) are:
o External LP, 18dB/octave @
300Hz
o External HP, 12dB/octave @
500Hz
o Internal LP, 12dB/octave @ 2,500Hz
o Internal HP, 12dB/octave @
4,400Hz.
NB: The user manual just says the internal
crossover is approximately 3,000Hz.
You have several options
regarding crossovers, which I’ll cover later.
Other changes which will deliver sonic benefit are as follows:
1. Replace the 1W ceramic ribbon-resistor
with 20 × 20W, 500mW 1% metal-film resistors in parallel (you need 20 resistors
to give you enough wattage in total).
2. Remove the mid-panel fuse (I have not destroyed
a mid-panel in 12 years of operating without mid-panel fuses!).
3. Some (brave!) people also remove the
ribbon fuse. If you live in the US,
where it’s easy to send your ribbons back to the factory for a rebuild, I
suggest this would be a reasonable thing to do. However, for the rest of us, although removing the ribbon fuse
delivers great sonic benefit I suggest it is a high-risk proposition. In any case, you should only consider
removing the ribbon fuses if you:
·
have an amp (or
amps) with plenty of current which never goes into clipping,
and
·
listen to vinyl
rather than digital sources.
4. Remove the back-panel wire connectors (I
use banana sockets with the internal speaker wire poking out through the socket
holes).
5. Reverse the whole base/mid-panel assembly –
so the perforated metal magnet-sheet is at the back of the speakers, not the
front, and you are listening to the mylar direct … rather than the sound which
comes through the holes in the metal!! (Magnepan
engineers must’ve been smoking something really weird when they
made that particular design decision!)
NB: This requires you to reverse the wires
going to the ribbons, to keep the same relative phase relationship with the
base/mid-panel assembly.
6. Replace the internal wire used by Magnepan
with something better. Everyone has
their own favourite brand of wire so I am not going to make any recommendations
here, however irrespective of the wire you use, it will sound better if you
take the wire which goes to the top of the ribbon out of its little channel in
the MDF and let it hang free – preferably outside the sock. With the wire in the channel, the signal is
being influenced by the MDF “dielectric”.
7. Stiffen up the panels by glueing aluminium
U-channel down each side. If you wanted
to take this stiffening idea to its extreme, glue U-channel on the top and
bottom edges as well.
NB: This means you are not going to be able
to put back the wooden side-pieces (unless you use a router to widen the slot
on their inside edge). However, I
suggest removing the styles makes your Maggies more attractive – particularly
if you have the black or grey socks.
All you see then are slim, black or grey panels!
8. A sonic advantage will be gained by isolating
the piece of MDF which the ribbon-assembly sits in, from the MDF panel which
the base/mid-panel assembly is fixed to … so base/mid vibrations do not shake
the ribbon-assembly. This requires you
to use an electric saw to cut a slot almost the whole length of the panel,
between the mid-panel and the ribbon-assembly (I suggest you remove the
ribbon-assembly first!!).
NB: If you have stiffened the top and bottom
edges of the panel with aluminium U-channel then this will be sufficient to
hold the piece of MDF panel in which the ribbon-assembly sits, in place … i.e.
you can extend the cut in the MDF from top to bottom, before glueing the
U-channel in place.
9. Replace the flimsy stock feet with a metal
stand like the Mye stand … or get your own made up. The purpose of these stands is to hold the long upright panel
rigidly so, ideally, they stands should have a long, heavy base with one or
more struts going forward to clamp or bolt onto each side of the MDF
panel. The result from holding the
panels rigidly will be increased low-level definition and more base!
NB: If you have stiffened the sides of the
panel with aluminium U-channel, this provides a convenient support for the
strut bolts.
However, if you have
done tweak #8, you will need a more complicated stand arrangement to cope with
an independent “ribbon-panel” … that side of the stand will have to bolt to the
outside edge of base/mid-panel MDF, not the outside edge of the
ribbon-assembly.
10. My own base/mid-panel assemblies are held into the rebates in the MDF
panels by many staples (I don’t know whether this is standard, as I bought
them second-hand). Particularly if
you have gone to the trouble of holding your panels rock-solid with some
substantial stands, you want the base/mid-panel assembly to be held firmly
against the MDF panel … but the staples are not capable of doing this for an
extended period of time (because MDF is too soft!).
I believe the ideal solution
is to use some short lengths of mild steel right-angle section which can be
screwed to the back of the MDF panel, so that their edges touch the back of the
metal plate and hold it firmly against the rebate in the MDF. You use one length of this right-angle
section between adjacent metal-plate support-bars.
Now, as far as crossovers
are concerned, your choices are influenced by the way the III/IIIA crossovers
are arranged – and they were arranged this way to make it simple for buyers to connect
them up to an amplifier … with a single set of speaker wires (remember, this
is ‘80s technology!!). Nowadays,
it’s customary to allow for bi- or tri-wiring, and re-organising the crossover
sections to allow for this will deliver additional sonic benefits.
There is an external
crossover box which handles the base low pass and mid-panel high pass
slopes. One pair of speaker wires goes
into this and two pairs go out – to the base-panel connections in the Maggie
back-plate and the mid/ribbon connections.
Then there is the internal
crossover – these components are glued to the bottom of the MDF panel, at the
back on the RHS. This takes the
mid/ribbon output from the external crossover box and splits it into the mid-panel
low pass and ribbon high pass slopes.
This means the ribbon HP section has already gone through the mid-panel
HP filter components (namely, a 60mF capacitor in the external
crossover box)
… which compromises the ribbon’s sonic output.
You have several options in
terms of replacing the stock crossovers … you can:
·
replace just
the external crossover box – and this can be active or passive.
· replace the internal
crossover as well – again, active or passive.
A common approach is to
replace the external crossover with a 24dB/octave L-R active crossover but
leave the internal crossover alone.
This requires 2 stereo amps and keeps your IIIAs in their original state
but, to me, does not deliver the full potential of the IIIA sound.
I believe the "ultimate" passive
crossover for the IIIA is to rebuild the complete crossover as three separate
sections:
·
base-panel low
pass (LP) section
·
mid-panel band
pass (BP) section, and
·
ribbon HP
section.
FYI, the well-known and very
helpful Jon Risch recommends, when building crossovers like these, to make sure
you use a common earth for each crossover sub-section. Tying the earth wire of each cable run
together, inside the crossover box, sounds better than if you keep separate earth
connections right through from power amp to driver.
Ripping out all the stock
crossover components and building the crossovers as three separate sub-sections
produces three advantages (apart from the better sound by using
better-quality components):
1. You have the ribbon HP filter
fed directly from the amplifier, thus bypassing the 60 mF capacitor in the stock
external mid-panel HP filter.
2. You can allow for as many
amplifiers as you have available … starting off with just one. Some people regard passive bi- or tri-amplifying
as a waste of time … I don’t because, in a tri-amped situation, each amp is
dedicated to the frequency range allowed by the crossover section it is
connected to and the three frequency bands are carried by separate speaker
cables. This minimises IM distortion in
your system.
In addition, if you have
multiple amps, you can use lower-powered amps without compromising your
sound. You would need a single amp with
a power rating of about double the sum of the power ratings of three amps, to
drive a IIIA equivalently to three separate amps in a tri-amped setup.
However, passive tri-amping
requires you to have a pre-amp with three pairs of output RCAs.
3. The 1W resistor can be put into
its proper place in the ribbon HP filter!
I believe Magnepan made an error during the short time the 2W ribbon was part of the IIIA
(they corrected it when they brought out the MG3.3). The 1W resistor should be located in
between the ends of the 0.4mH inductor which parallels the ribbon (because
it is there to make the total resistance of the ribbon 3W, the same as the previous
ribbon). However, it is in fact after
the inductor … which means the theoretical -3dB rolloff point of 4,100Hz is in
fact 4,400Hz!!
I personally have gone to a
3-way active setup because I believe this delivers the best sonic
result. However, this means you:
·
need 3 stereo
amps, and
·
the amp
powering the ribbons must have a minimal "power on thump" (because
the ribbon is directly connected to it ... whereas, with an “internal” passive
crossover, the series cap protects the ribbon).
If you choose to stay
passive, then I recommend staying with the stock crossover slopes – i.e.:
·
18dB/octave for
the base LP )
·
12dB/octave for
the mid-panel HP) (external crossover)
·
12dB/octave for
the mid-panel LP)
·
12dB/octave for
the ribbon HP ) (internal
crossover).
If you go 3-way active, I suggest it is best to use the stock slopes as well. However, irrespective of whether you choose the active or passive alternative, you then have to decide whether to:
·
stay with the
stock IIIA crossover -3dB points, or
· adjust the two pairs of -3dB points slightly, to flatten out the
overall frequency response (because the stock IIIA frequency plot is far
from flat!).
My reasoning for arriving at
the optimum crossover points follows and is based on extensive crossover
modeling with LspCAD. I prefer to
specify the -6dB (half power) points than the -3dB (70% power)
points. Note: for a 24dB/octave L-R
crossover, the two -6dB points are identical:
The optimum
relative output levels for the three frequency bands of your active crossover
need some discussion here. The “best”
setup could be influenced by your listening environment but my reasoning is as follows:
1.
As I mentioned earlier, I believe Magnepan made an error putting
the 1ohm “new ribbon resistor” outside the 0.4mH inductor. Using LspCAD to model the “theoretical” vs.
the “actual” positioning of the 1W resistor
produces quite different relative dB levels for the ribbon, compared to the
mid- and bass-panels (more than 3dB down).
If my theory is
correct, the ribbon asymptote at 20KHz is 1dB above the level of the mid- and
bass panels (which are equal).
2.
Some people use the “tweeter attenuation resistor” to tame the
glare of their ribbons – ie. they find the ribbon output too high.
3.
Furthermore, people doing research into the perceived sound of 3 or
4-way speakers which have been engineered to give a flat frequency response,
have reported that they generally sound too bright … i.e. the high frequencies
are too pronounced.
As a result of the above reasoning, I suggest the output
levels of your 3-way active crossover should be set so that:
·
the bass output is equal to the mid output
·
the ribbon output is 1dB down (i.e. × 0.89).
I appreciate the
above does contradict the “ruler flat” frequency response of a 3-way 24dB L-R
crossover but I believe your Maggie will sound better for it! And with an active crossover, it’s an easy
matter to change output levels!
1.
The (external)
base LP/mid-panel HP crossover
The stock base LP -6dB point
is 370Hz; the mid-panel HP -6db point is 310Hz.
This produces a hump at 250Hz
and a suckout at 500Hz.
Now, two inter-relating
factors are at work here:
·
the large base
panel is “slow” compared to the much smaller mid-panel – thus, moving the -6dB
point downwards helps the base panel, but
·
the mid-panel’s
-6db point is already close enough to the resonant frequency of the mid-panel –
so this should be increased, if possible, certainly not decreased.
Luckily, a much flatter
crossover response curve is obtained by moving the base -6dB point down to 330Hz
and the mid-panel -6db point up to 330Hz.
So both drivers are helped by this change.
2. The (internal)
mid-panel LP/ribbon HP crossover
The stock mid-panel LP -6dB
point is 3,100Hz; the ribbon HP -6db point is 2,200Hz.
This overlap produces a 1.8dB
hump at 1,900Hz
A much flatter crossover
response curve is obtained by reducing the overlap – moving the mid-panel -6dB
point down to 2,900Hz and the ribbon -6db point up to 2,700Hz.
The -6dB points calculated
above are appropriate to either a passive or active crossover (or hybrid)
environment. However, if you choose the
3-way active route, another alternative is to use 24dB/octave L-R slopes at
both crossover points. This has two
advantages:
·
all 3 drivers
are connected with the same polarity (whereas in the stock IIIA, the
mid-panel is inverted) – however, remember the ribbon connections are
reversed if you have “flipped” the base/mid-panel assembly, and
·
you get a
ruler-flat overall frequency response.
From the reasoning above,
the optimal -6dB crossover points for a 3-way active 24dB/octave L-R setup are
330/340Hz and 2,600/2,700Hz.
I suggest the decision as to
whether you should go 24dB/octave L-R or stock slopes will come down to how
much you value the two advantages of 24dB/octave L-R versus the use of 4th
order crossover slopes instead of mainly 2nd order.
If you decide merely to
upgrade the stock crossover components then the values are as follows:
1. External crossover (base LP/mid-panel HP):
·
3.6mH
·
1.17mH
·
150mF
·
3.5mH
·
60mF
2. Internal crossover (mid-panel LP/ribbon HP):
·
0.4mH
·
12mF
·
0.7mH
·
12mF
·
1W resistor (20 × 20W, 500mW 1% metal-film in
parallel)
If you decide to slightly
change the stock crossover points, to flatten the overall frequency response,
the passive component values become:
1. Base low pass filter:
·
3.6mH à 3.9mH
·
1.17mH à 0.9mH
·
150mF à 120mF
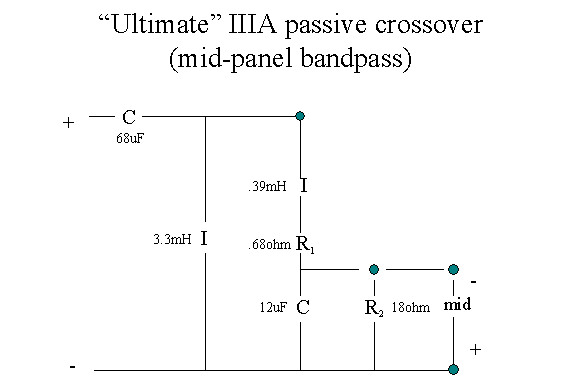
2. Mid-panel band pass filter:
·
3.5mH à 3.3mH
·
60mF à 68mF
·
0.4mH à 0.39mH
·
12mF à 12mF
·
R1 = 0.68W
·
R2 = 18W
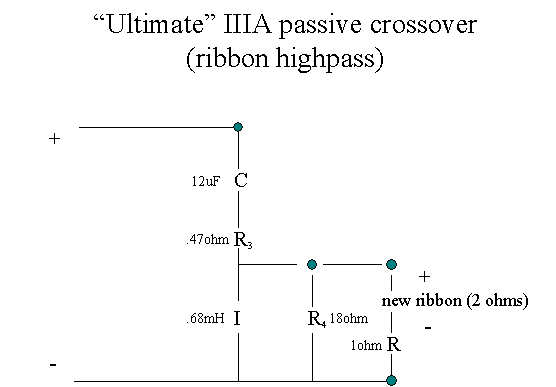
3. Ribbon high pass filter:
·
0.7mH à 0.68mH
·
12mF à 11mF
·
1W resistor (20 × 20W, 500mW 1% metal-film in
parallel)
·
R3 = 0.47W
·
R4 = 18W.
NB1: The above assumes the ribbon HP filter is
fed directly from the input of the external crossover – i.e. the ribbon HP
filter is removed from the output of the external crossover.
NB2: This requires the relative sound levels
of the mid-panel and ribbon to be reduced slightly – hence the need for R1 to
R4. The mid-panel band pass filter
output needs to be reduced because the ribbon HP filter is no longer being fed
by the external crossover. The ribbon
HP filter output needs to be reduced for two reasons:
1.
the ribbon signal no longer goes through the external mid-panel HP
filter, and
2.
to reduce the “glare” which most people experience with the IIIA.
R1 goes between
the 0.39mH coil and the mid-panel.
R2 goes across the
12mF capacitor (and the mid-panel).
R3 goes between
the 11mF cap and the ribbon.
R4 goes across the
0.68mH coil (and the ribbon)
NB3: Low DCR inductors have been assumed –
e.g. 12 gauge Alpha-Core foil inductors for the smaller values.
NB4: The above values give what I believe is
an ideal overall frequency response for the IIIA, however, there is no one
“optimum” … slightly different values will produce an equivalent end-result
(however, I suggest you need LspCAD to do this properly).
Schematics of these
crossover sections are: